Embrace Playfulness This Halloween Season

Featured

Photo by Daisy Anderson on Pexels.com

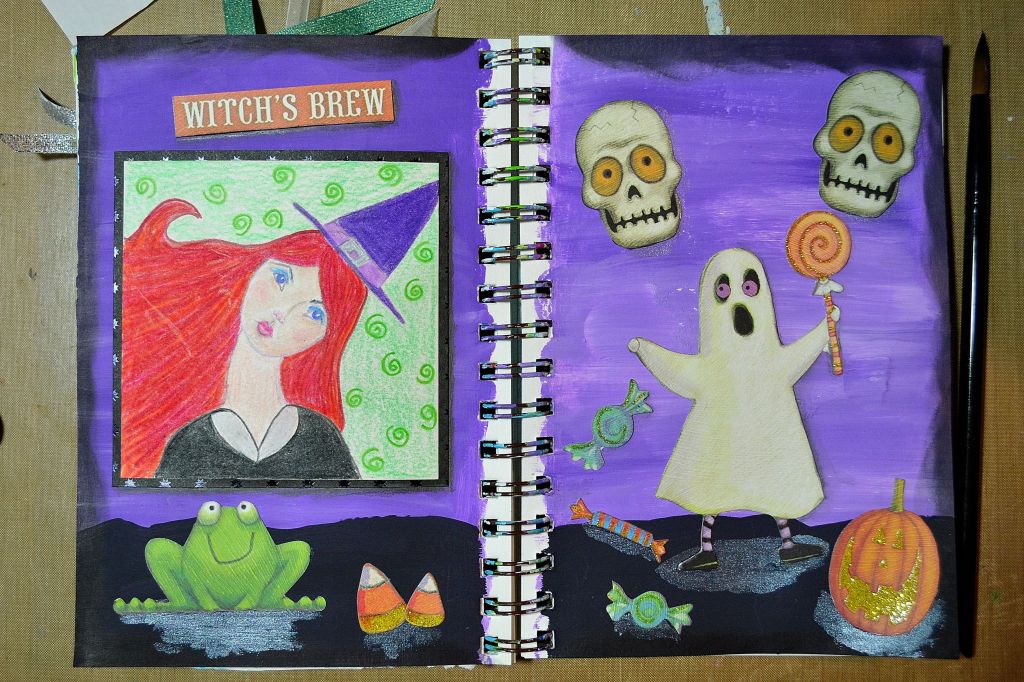
Once a year, the world feels just a little more playful. Pumpkins line doorsteps. Costumes take over closets. Adults and kids alike find themselves caught up in the excitement of something that’s all too rare in our day-to-day lives: pure, creative fun.

Halloween isn’t just about candy or costumes—it’s a yearly invitation to loosen up, use our imaginations, and remember how good it feels to play.


🧡 Letting Go of Being So Serious

Modern life often comes with a constant pressure to be polished, productive, and in control. But Halloween gives us permission to hit pause on all of that. It’s a reminder that not everything has to be so serious.

When you put on a costume—even a simple one—you’re saying, “Today, I choose joy.” You don’t have to be perfect. You just have to be present. Whether you’re handing out candy, carving a pumpkin, or walking through a neighborhood full of decorations, you’re participating in something simple and powerful: fun for fun’s sake.


🌟 Reawakening the Imagination

When’s the last time you played pretend?

Halloween is powered by imagination. It brings us back to a mindset we knew well as kids—the freedom to invent, explore, and dream without rules. Whether you’re creating a costume, decorating your space, or telling a spooky (but not too spooky) story, you’re flexing your creative muscles in the best possible way.

And imagination isn’t just for October 31st. It’s something we use in everyday life—solving problems, telling stories, thinking ahead. Halloween just reminds us how joyful and refreshing it can be when we let that creativity run free.


🍬 Enjoying the Moment

There’s something beautiful about the simplicity of Halloween joy.

Kids running from house to house. Laughter echoing down the street. The crunch of leaves, the glow of jack-o’-lanterns, the sense that—just for tonight—it’s okay to just be in the moment.

Halloween doesn’t require expensive plans or perfect conditions. It invites us to slow down and enjoy what’s right in front of us: a playful moment, a spark of imagination, a shared smile.


✨ Let the Spirit of Play Stay With You

So this Halloween, whether you’re dressing up, decorating the house, or simply soaking in the season, give yourself the gift of play. Let your imagination take the lead. Let go of the need to do everything “right.”

Because when we allow ourselves to be a little more playful, we feel more alive, more connected, and often—more ourselves.

What’s one way you’re bringing a little more play and imagination into your life this season?
Let me know in the comments—I’d love to hear how you’re celebrating!

Here’s to imagination, laughter, and letting go!

Thanks so much for stopping by!!

Share the Happy💖🎃

Thoughtful Thursday Learn the History of Jack-O’-Lanterns and How to Carve One

Photo by u0412u0438u043au0442u043eu0440u0438u044f u0411u0438u043bu0430u043d on Pexels.com

Carving jack-o’-lanterns is a Halloween tradition with roots in Irish folklore. The story comes from a man named “Stingy Jack,” who, according to legend, tricked the devil and was doomed to wander the Earth with only a carved-out turnip lantern to light his way. When Irish immigrants came to America, they found pumpkins more plentiful and easier to carve than turnips, and the modern jack-o’-lantern was born.

How to Carve Your Own Jack-O’-Lantern

  1. Pick a Pumpkin – Choose a pumpkin with a smooth surface and sturdy stem.
  2. Cut the Top: Before you begin, make sure to review the safety tips below. Using a sharp knife, carefully cut a circular lid around the stem, angling the knife slightly inward to prevent the top from falling inside the pumpkin.
  3. Scoop It Out – Remove the seeds and pulp from inside the pumpkin.
  4. Draw Your Design – Use a marker to outline the face or pattern you want to carve.
  5. Start Carving – Carefully carve along your design with a small serrated knife.
  6. Light It Up – Place a battery-powered candle inside, replace the lid, and watch it glow!

Safety Tips

  • Take Your Time: Avoid rushing the process. Use slow, controlled movements to maintain accuracy and reduce the risk of accidents.
  • Use the Right Tools: Opt for pumpkin carving kits designed for safety, especially if children are involved.
  • Adult Supervision: Always have an adult present when using sharp knives or tools.
  • Cut Away from Your Body: When carving, make sure to cut away from yourself to avoid accidents.
  • Maintain a Tidy Workspace: Keep your carving area clean and free of debris to prevent slips and accidents. Ensure the workspace is well-lit so you can see clearly while you carve.
  • Handle Pumpkins Carefully: Ensure your pumpkin is stable while carving to avoid any injuries.
  • Keep the Pumpkin Lid On: For extra safety, keep the pumpkin lid on while carving. This helps prevent accidents by reducing the temptation to reach inside, minimizing the risk of cuts or injuries.

Now you’re ready to safely create and display your spooky jack-o’-lantern!

Thanks for stopping by🍁🍂

Share the Happy💖

Happy Halloween!!!

It’s already Halloween and we have just mere 62 days until we ring in the new year! I’m excited but at the same time I’m want to slow things down and take in these beautiful breezy fall days and everything this season has to offer. Hope you have a fun filled day planned with family and friends and lots of goodies 🎃🎃

Thanks for stopping by!!

Share the Happy💖

Photo by u0410u043bu0435u043au0441u0430u043du0434u0430u0440 u0426u0432u0435u0442u0430u043du043eu0432u0438u045b on Pexels.com

Spooky Haunted House

This started as a plain, unfinished wood birdhouse which I transformed into a fun spooky haunted house. To get that old vintage painted look you need Folk Art Crackle Medium which is available on Amazon. It’s super easy to use. I simply painted the house with black paint first, allowed it to dry and then applied a coat of crackle medium and allowed that to dry. Last I painted it orange and as that layer of paint dries, it begins to crackle. Very cool product!

I added embellishments I found at the craft store but was having no luck at all finding a ghost. And you can’t have a haunted house without a ghost👻 So I made this one using a Styrofoam ball and covered it with a small piece of sheer fabric.

This is a fun Halloween decoration and would also be a great and easy project to make with kids! Hope this inspires you, thanks for stopping by!!

Share the Happy💖

Thoughtful Thursday Jack-O-Lanterns

Photo by Matheus Bertelli on Pexels.com

I always wonder how things got started and who started them. With Halloween approaching in just a few days I thought it would be fun to learn about jack-o-lanterns.

The term jack-o-lantern started in Britain in the 17th century. At the time it was common for the British to call a person Jack when they didn’t know his name. So now we know where the “Jack” part of the term came from but what about the o-latern?

The o-lantern term was also commonly used in the 17th century to refer to a man carrying a lantern or a night watchman. And since they may not have known his name the term jack-o-lantern was born. But how did we go from the term jack-o-lantern to carving a pumpkin for Halloween?

Well there are quite a few theories on that. One is it was a Celtic pagan practice to carve out turnips or some other type of root vegetable and then illuminate it to ward off evil spirits. The custom was then carried on by Christians during the feast of All Hallows Eve.

Another more creepy theory is centered around an Irish folklore. There are several versions of this folklore but they all have certain common elements like a man named Jack, the devil and an illuminated turnip with which Jack’s soul aimlessly wanders the earth.

But here in the states during the 19th century, young kids who liked pranks would carve a grotesque face out of a readily available pumpkin to scare unwary people. Eventually this prank became known as jack-o-lantern. Today this has became a widely used and artistic tradition by many for Halloween.

Which is your favorite theory?

Hope you enjoyed this little history snippet. Thanks for stopping by!!!

Share the Happy 💖

Candy Corn Witch Hat

When I was a kid, candy corns were one of my favorite Halloween treats. They made awesome vampire fangs 😂 So it’s no wonder I used them to make a witch’s hat.

For this project I recommend getting clay candy corns. You can use real ones and coat them in Mod Podge, but they won’t last whereas the clay ones will. If you want to get even more creative you could make them yourself 😊

This is a fun and easy Halloween Decoration to make for your home and is great for kids too.

For this Project you will need:

  • Large Paper Mache Witch Hat (about 12 inches tall)
  • Acrylic Paints: Folk Art School Bus Yellow and Black
  • Clay Candy Corns
  • 18″ white netting
  • Black Pom-poms: 1 large and 1 small
  • 2 small wiggle eyes
  • 2 Yellow/Orange Chenille Stems Pipe Cleaners 
  • Letter Rubber Stamps
  • Staz On Stone Gray Ink
  • Small Orange Boa, 18-24 inches long depending on your hat
  • Sponge brushes (makes painting big sections faster)
  • Aleene’s Tacky Glue
  • Glue Gun
  • Scissors
  • Wire cutters
  • 1/2″ flat brush
  • Clean water, paper towels, wax-coated paper plates for paint palette
  • Mod Podge: Matte for sealing (optional)

Instructions

  1. Basecoat the top of your witch hat in black paint using the 1/2″ brush. Apply 2-3 coats and let dry in between coats.
  2. Basecoat the bottom and inside of the hat with 1 coat of the black paint using the 1/2″ brush. Let dry.
  3. Basecoat the rim of the hat, on top in yellow paint using the 1/2″ brush. Apply 2-3 coats and let dry in between coats.
  4. Using the glue gun, randomly glue candy corns around the top of the hat.
  5. Stamp you letters around onto the rim of the hat. If you’re not going to seal your hat with Mod Podge go to Step 8.
  6. (Optional) Using your sponge brush apply a coat of Matte Mod Podge to the entire hat to seal it. Let dry. Once dry you can apply a second coat of Mod Podge if you so desire.
  7. (Optional) Apply 1 coat of Mod Podge to the bottom and inside of the hat. Let dry      
  8. For the spider, glue the small pom-pom to the large pom-pom using tacky glue.
  9. Using wire cutters, cut five 2″ pieces of the yellow/orange pipe stem. Bundle 4 of the pieces and twist the 5th piece around the center of the bundle to hold in place. Spread out the pieces and shape your spider legs. Cut off any excess.
  10. Glue your spider body to the legs with tacky glue. Next glue the wiggle eyes to the front of the small pom-pom. Let dry.
  11. Apply a generous amount of tacky glue to the inner seam of the hat where it meets the rim. Wrap your boa around the hat and cut off any excess. Let dry.
  12. Cut a 12″ piece of netting and tie the center into a knot. Apply tacky glue to the tip of the hat and place the center of the knot over the hat. Let dry.
  13. Gently insert the spider fee into the netting holes and you’re done!

Hope you enjoy making this fun Candy Corn Witch Hat🎃 Thanks for stopping by!!

Share the Happy 💖

Candy Corn Witch Hat

Thoughtful Thursday Halloween Decor

I wanted to share with you some fun Halloween decorations that you can easily make. I love vintage images and had purchased these at a show I was at, but you can find tons online. Please read the instructions first before beginning so you have an idea of what you will be doing. The supply list is at the bottom of this post.

Instructions

  1. Decide how you want to hang your plaques. Based on the type of plaque you have you may want to attach a picture hook to the back or you can drill 2 small holes in the top corners and sand them if needed.
  2. Apply a good coat of gesso to each plaque, front and back.
  3. Find images online and print them on cardstock. Cut them out and set aside.
  4. Paint each plaque in a coordinating color. Let dry overnight. Sand edges for a worn look and wipe off dust.
  5. Steps 6, 7 and 8 are the instructions for hanging with wire. If you used a picture hook in the back of your plaque, skip steps 6, 7 and 8. Another alternative to the wire is to use a piece of fabric or yarn which you would also skip these 3 next steps.
  6. Cut 11 inches of the jewelry wire. From the back of the plaque, put one end through the hole, coming out of the front of the plaque and coil the end with the pliers to knot it.
  7. Slightly off center at the top of the wire, wrap the wire around a pencil, 3 times and slide the pencil out.
  8. Feed the other end of the wire through the second hole from the back of the plaque, coming out in the front. Cut off any excess wire and coil the end as in step 6.
  9. Glue your images on to the plaque with Aleene’s Tacky Glue.
  10. Add a piece of torn autumn fabric to the top of the wire and that’s it!

Supplies:

  • 3 Vintage Halloween Images
  • 3 Wood Plaques fitting your images
  • Gesso
  • Acrylic Paint: Black, Orange, Red or any of your choice
  • Black Copper Jewelry Wire
  • Drill for hanging
  • Picture hanging hook/bracket (optional)
  • Needle nose jewelry pliers
  • Harvest Fabric scraps
  • Aleene’s Tacky Glue

Hope you enjoyed this tutorial!

Thanks for stopping by!!

🎃 Share the Spooky 🎃

Witch’s Brew Art Journal

I created this witch with colored pencil on a 4″ square piece of mixed media paper last year for an art challenge. Sadly, she didn’t win but she sure was a lot of fun to make so I had to find a way to use her. In my stash I found these fun Halloween cut outs from K & Company and thought they went well together. I really loved that some were accented with sparkly glitter so I didn’t have to add Stickles this time, lol.

I used my 5.5″ x 8″ Strathmore Mixed Media Journal for this layout. I started by coating the pages with white gesso. Once that was dry, I painted the background purple. The darker bottom layer was made using the same purple paint but mixed with black paint. While it was drying I cut a 4.25″ square from black cardstock and mounted the witch drawing. You can draw anything you want on the 4″ square with colored pencils, markers, crayons or whatever strikes your fancy. Just use your imagination and think spooky!

Next I used Ranger Black Soot to distress the edges. I picked the Halloween cut outs I wanted to use and glued them along with the witch to the pages. Next I used a little silver paint for shimmering shadows. Last I added more shading with a dark gray Stabilo pencil and that was it!

Hope you enjoy making your spooky layout. Thanks for stopping by!

Share the Happy!!!

Supplies Used:

  • Strathmore Mixed Media Journal – 5.5″ x 8″
  • Gesso
  • Spooky Halloween Drawing on a 4″ Square piece of Mixed Media Paper
  • K & Company Die-Cut Cardstock (TC Halloween Pumpkin and Friends)
  • Acrylic Paint: Purple, Black, Silver
  • Ranger Distress Ink – Black Soot
  • Dark Gray Stabilo Pencil
  • Paint Brush
  • Paper Towels
  • Aleene’s Tacky Glue
  • Water

Spooky Halloween Decoration

I found this wooden cut out in the Art and Craft store and thought it would be fun to make it into a Halloween Decoration. It’s fairly easy to make with minimal supplies and would be a great project to make with kids, supervised of course 😉

Supplies:

  • Wooden “Spooky” cut out with hanging wire
  • Gesso
  • Folkart Crackle Medium
  • Acrylic Paint: Red, Black
  • Acrylic Paint Pens: Red, White
  • Stickles: Xmas Red
  • Inkssentials Glossy Accents
  • 2 Black glitter pumpkin bell ornaments

Instructions:

  1. Paint the wooden cut out with gesso. Let dry.
  2. Paint cut out with red acrylic paint. Let dry.
  3. Paint cut out with Folkart Crackle Medium. Let dry.
  4. Paint cut out with black acrylic paint. Note: While this layer dries, the paint will start to crack and you’ll see the red paint underneath show through. Make sure to let this completely dry before moving on.
  5. Using the white and red acrylic paint pens, outline the letters a little to make them stand out more. Note: If you don’t have the pens, you can also use a liner brush dipped in white and red acrylic paint to make the thin lines.
  6. Add drops of blood to the letters with the red Stickles. Let dry.
  7. Using the Glossy Accents, go over the Stickles blood drops. Once dry, this will give the droplets a 3D effect.
  8. Last, tie on your pumpkin ornaments to the ends where the wires are and that’s it!