Thoughtful Thursday Easy Homegrown Sprouts

Last week I talked about the Benefits of Growing your own Sprouts and today I’m excited to guide you through the simple process of growing them indoors. You’ll be amazed at how effortless it is! All you need are a few basic supplies all of which are available on Amazon or possibly in your local health food or grocery stores. I’ve included some links in the supply list below but there are many options.

Supplies:

Instructions:

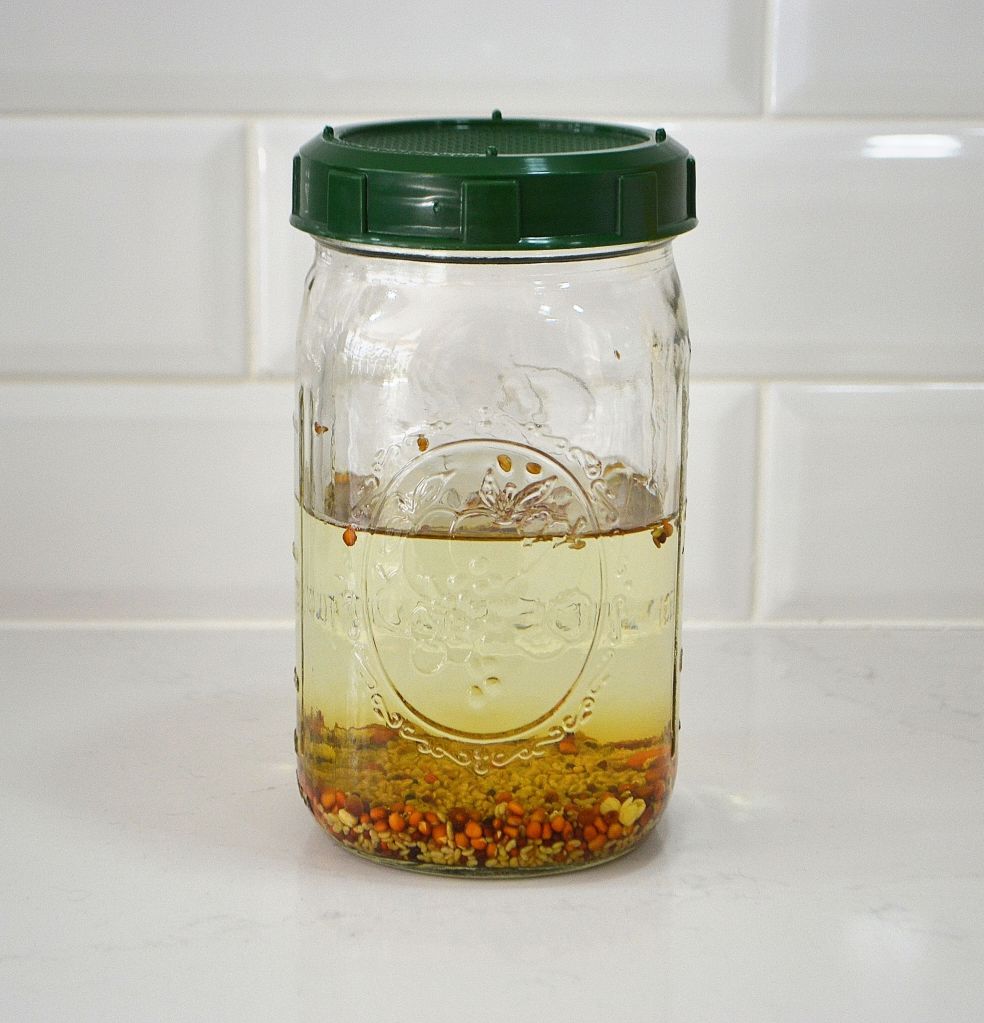
  1. Fill your mason jar with 2 cups of water and add 1-1.5 tablespoons of seeds. Gently mix the seeds in the water (sometimes they clump together). Place the sprouting lid on and let them soak overnight for 8-12 hours. Follow the recommendation on the seed packet.
  2. Rinse the seeds 2-3 times until the water is mostly clear.
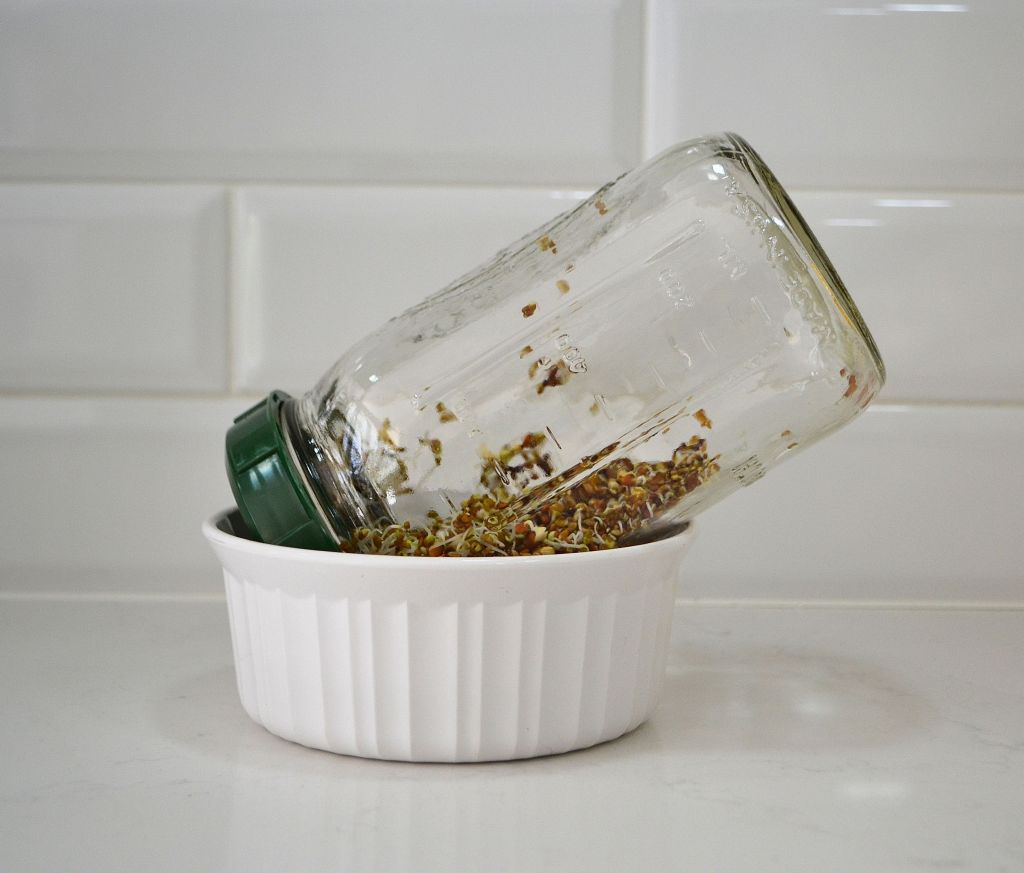
  3. Invert the jar and let it slant slightly inside a bowl allowing the remaining water to drain from the seeds (see pictures below).
  4. Rinse the seeds 2-3 times per day, and put them back into the bowl inverted. Florida is very humid so I only rinse 2 times per day. If you use too much water, you may grow mold so adjust this based on your environment.
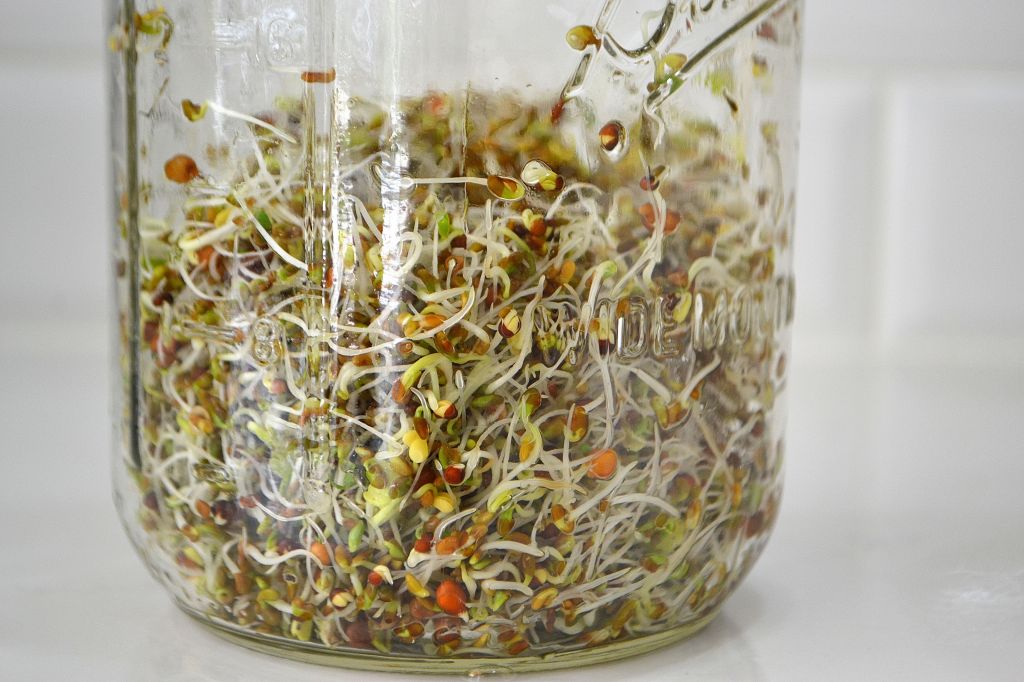
  5. Depending on the seeds you have it will take about 4-5 days to get sprouts. At that point they may be yellow so place them on a sunny windowsill to help turn them green.
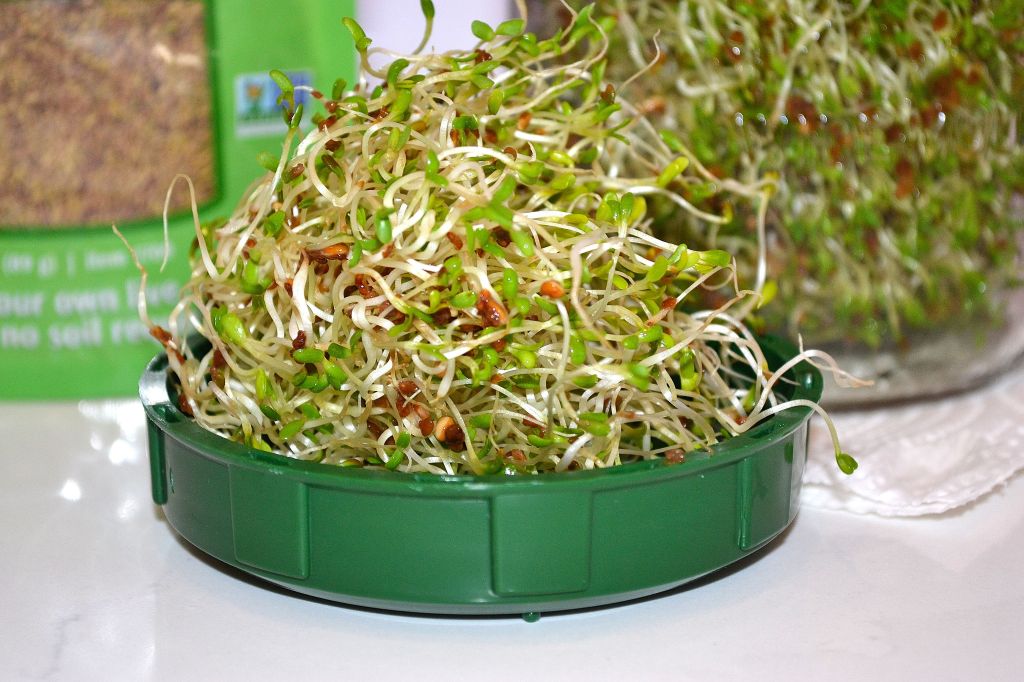
  6. Give them a final rinse and remove any of the seed hulls. Put the sprouts back into the jar and store in the fridge. Now they’re ready for you to enjoy!

Through my experimentation, I’ve observed that alfalfa tends to sprout faster than broccoli. However, in the photos you see here, I’ve opted for a salad mix variety, which not only sprouts delightfully but also boasts a delicious blend of organic radish, broccoli, and alfalfa. These sprouts aren’t just nutritious; they’re versatile too! I enjoy incorporating them into salads, blending them into smoothies, and using them as a flavorful garnish on a variety of vegan dishes. They truly elevate any meal!

Growing your own sprouts at home is not only easy and rewarding but also adds a fresh and nutritious touch to your culinary adventures. Whether you’re a salad enthusiast, or a smoothie aficionado these vibrant sprouts are sure to delight your taste buds and nourish your body. So why wait? Start sprouting today and embark on a journey of delicious and wholesome eating!

Thanks for stopping by!

Share the Happy 💖

“Good nutrition creates health in all areas of our existence. All parts are interconnected.” ~T. Collin Campbell

Abstract Art Journaling

Excited to share my latest creation with you. This is a new organic abstract using watercolors and Saran Wrap. The colors were a little too soft for me, so I added more of the same watercolor to each individual shape.

Creating these organic abstracts in my Strathmore 8×5.5″ Watercolor Journal has been an absolute blast! I really love the vibrant rainbow of colors and intricate design on this one! What are your thoughts?

Wishing this brings a little inspiration your way today. Thanks for dropping by!

Share the Happy💖

“Remember, happiness doesn’t depend upon who you are or what you have, it depends solely upon what you think.” ~Dale Carnegie

Photo by Egor Kamelev on Pexels.com

Abstract Art Journaling

As many of you know, I’ve been playing with Saran Wrap and watercolor paints creating some really cool organic abstract designs. Last Sunday, I spent a good part of my day working on this abstract in my Strathmore 8×5.5″ Watercolor Journal.

I love bright colors but the paints dried light so I used colored pencils that matched the paint underneath to make it pop. I also used a burnisher which softens your pencil lines and gives them a more fluid look. I found the burnisher also works on watercolor paints but the end result isn’t as bright. Overall I thought it turned out pretty cool 😎 What do you think?

Hope this inspires you, thanks for stopping by!!

Share the Happy💖

Deer Abstract Art Journaling

I created a new abstract in my Strathmore 8.5 x 5.5″ watercolor art journal. I used yellow and magenta watercolor paints along with a small piece of Saran Wrap to create this design. The fun part of this technique is you’re never sure what will appear and in this one I found a beautiful deer.

Deers are said to symbolize gentleness, grace, freedom and strength. So I added a few words to the design: kindness, gentleness, open your 💖 Although, I’m not sure why this deer appeared in my art, I was very happy it did!

Hope this inspires you in some way today. Thanks for stopping by!!

Share the Happy💖

Photo by Pixabay on Pexels.com

Mountains Abstract Art Journaling

I wanted to have some fun creating watercolor abstracts in my Strathmore 8.5 x 5.5″ watercolor art journal. To create this fun design simply add your watercolor paints to the paper (leaving them fairly wet) and cover it using plastic wrap. Set it aside to completely dry. Then remove the plastic wrap and see what fun shapes you have.

For this design, I saw mountains emerge and went with that. Some areas turned out too light so I used colored pencils to give it more depth and to define the mountain tops a little more. It was still needed a pop of color so I added I added pink flowers and of course finished it off with a little bling.

Hope this inspires you in some way today. Have a fantastic weekend and thanks for stopping by!!

Share the Happy💖

Candy Corn Witch Hat

When I was a kid, candy corns were one of my favorite Halloween treats. They made awesome vampire fangs 😂 So it’s no wonder I used them to make a witch’s hat.

For this project I recommend getting clay candy corns. You can use real ones and coat them in Mod Podge, but they won’t last whereas the clay ones will. If you want to get even more creative you could make them yourself 😊

This is a fun and easy Halloween Decoration to make for your home and is great for kids too.

For this Project you will need:

  • Large Paper Mache Witch Hat (about 12 inches tall)
  • Acrylic Paints: Folk Art School Bus Yellow and Black
  • Clay Candy Corns
  • 18″ white netting
  • Black Pom-poms: 1 large and 1 small
  • 2 small wiggle eyes
  • 2 Yellow/Orange Chenille Stems Pipe Cleaners 
  • Letter Rubber Stamps
  • Staz On Stone Gray Ink
  • Small Orange Boa, 18-24 inches long depending on your hat
  • Sponge brushes (makes painting big sections faster)
  • Aleene’s Tacky Glue
  • Glue Gun
  • Scissors
  • Wire cutters
  • 1/2″ flat brush
  • Clean water, paper towels, wax-coated paper plates for paint palette
  • Mod Podge: Matte for sealing (optional)

Instructions

  1. Basecoat the top of your witch hat in black paint using the 1/2″ brush. Apply 2-3 coats and let dry in between coats.
  2. Basecoat the bottom and inside of the hat with 1 coat of the black paint using the 1/2″ brush. Let dry.
  3. Basecoat the rim of the hat, on top in yellow paint using the 1/2″ brush. Apply 2-3 coats and let dry in between coats.
  4. Using the glue gun, randomly glue candy corns around the top of the hat.
  5. Stamp you letters around onto the rim of the hat. If you’re not going to seal your hat with Mod Podge go to Step 8.
  6. (Optional) Using your sponge brush apply a coat of Matte Mod Podge to the entire hat to seal it. Let dry. Once dry you can apply a second coat of Mod Podge if you so desire.
  7. (Optional) Apply 1 coat of Mod Podge to the bottom and inside of the hat. Let dry      
  8. For the spider, glue the small pom-pom to the large pom-pom using tacky glue.
  9. Using wire cutters, cut five 2″ pieces of the yellow/orange pipe stem. Bundle 4 of the pieces and twist the 5th piece around the center of the bundle to hold in place. Spread out the pieces and shape your spider legs. Cut off any excess.
  10. Glue your spider body to the legs with tacky glue. Next glue the wiggle eyes to the front of the small pom-pom. Let dry.
  11. Apply a generous amount of tacky glue to the inner seam of the hat where it meets the rim. Wrap your boa around the hat and cut off any excess. Let dry.
  12. Cut a 12″ piece of netting and tie the center into a knot. Apply tacky glue to the tip of the hat and place the center of the knot over the hat. Let dry.
  13. Gently insert the spider fee into the netting holes and you’re done!

Hope you enjoy making this fun Candy Corn Witch Hat🎃 Thanks for stopping by!!

Share the Happy 💖

Candy Corn Witch Hat

Custom Keepsake Ornament

With the loss of my little Cocoa this past summer and being stuck in bed this entire holiday season, my thoughts were on her a lot. She was quite a character and loved to rip our presents open. You can see her ears flying madly as she shredded the paper on this gift. This was serious business for Cocoa, she made us all laugh 😂

So to keep a reminder of Cocoa at Christmas, I made this ornament. It’s a beautiful way to remember those we’ve lost whether our furry kids or family and friends. It’s also a great way to create a custom keepsake for special moments. This started as a simple paper mache circle ornament, but wood would work just as well.

Round Paper Mache Ornament - Christmas Ornaments ...
Paper Mache Ornament

Supplies

  • 3.75″ Paper Mache Circle Ornament or Wood Ornament
  • Gesso
  • Acrylic paint in coordinating color to match photos
  • 3.5″ circle photograph of your loved one
  • 3.25″ x 2.5″ rectangular/freeform photograph of your love one
  • Golden Matte Medium
  • Posca Paint Marker .7mm
  • Sakura Pen .005 or other Waterproof Fine Tip Marker
  • 14″ Trim of your choice
  • Stickles – Star Dust
  • Aleene’s Tacky Glue

Instructions

  1. Paint your paper mache ornament with gesso and let dry.
  2. Paint your entire ornament, including the edges with the acrylic paint using a 3/4″ flat brush. Let dry. Give it a second coat if needed.
  3. Print and cut your photographs to fit the ornament. The approximate sizes are listed above.
  4. Using the matte medium, adhere your photograph to one side of the ornament. Apply a coat of matte medium over your photograph to seal and protect it. Let dry. {Note: depending on the ink you use to print your photo, you may want to test the matte medium on a sample photo to make sure the ink doesn’t bleed.}
  5. Follow step 4 with the 2nd photo on the other side. Let dry.
  6. Add any names, dates or sentiments with your Sakura pen.
  7. Using the your Posca pen, add little stars and doodles. Let dry.
  8. Accent one side of your ornament with Stickles and let dry. Then repeat on the other side if desired. Let dry.
  9. Last, using Aleene’s Tacky Glue, adhere your trim to the edge of the ornament and cut off any excess. Now you have a beautiful keepsake of your loved one or that special moment.

I hope you enjoy creating your custom keepsake. Keep in mind, these would also make great gifts too 😊

Thanks for stopping by!!

Share the Happy 💖

Thoughtful Thursday Halloween Decor

I wanted to share with you some fun Halloween decorations that you can easily make. I love vintage images and had purchased these at a show I was at, but you can find tons online. Please read the instructions first before beginning so you have an idea of what you will be doing. The supply list is at the bottom of this post.

Instructions

  1. Decide how you want to hang your plaques. Based on the type of plaque you have you may want to attach a picture hook to the back or you can drill 2 small holes in the top corners and sand them if needed.
  2. Apply a good coat of gesso to each plaque, front and back.
  3. Find images online and print them on cardstock. Cut them out and set aside.
  4. Paint each plaque in a coordinating color. Let dry overnight. Sand edges for a worn look and wipe off dust.
  5. Steps 6, 7 and 8 are the instructions for hanging with wire. If you used a picture hook in the back of your plaque, skip steps 6, 7 and 8. Another alternative to the wire is to use a piece of fabric or yarn which you would also skip these 3 next steps.
  6. Cut 11 inches of the jewelry wire. From the back of the plaque, put one end through the hole, coming out of the front of the plaque and coil the end with the pliers to knot it.
  7. Slightly off center at the top of the wire, wrap the wire around a pencil, 3 times and slide the pencil out.
  8. Feed the other end of the wire through the second hole from the back of the plaque, coming out in the front. Cut off any excess wire and coil the end as in step 6.
  9. Glue your images on to the plaque with Aleene’s Tacky Glue.
  10. Add a piece of torn autumn fabric to the top of the wire and that’s it!

Supplies:

  • 3 Vintage Halloween Images
  • 3 Wood Plaques fitting your images
  • Gesso
  • Acrylic Paint: Black, Orange, Red or any of your choice
  • Black Copper Jewelry Wire
  • Drill for hanging
  • Picture hanging hook/bracket (optional)
  • Needle nose jewelry pliers
  • Harvest Fabric scraps
  • Aleene’s Tacky Glue

Hope you enjoyed this tutorial!

Thanks for stopping by!!

🎃 Share the Spooky 🎃

Save Our Oceans and Turtles Journal Pages (Part 2)

The other week I posted Page 1 of this journal spread. For my focal point on the second page I used a tag that I made a while ago and stashed away for later use. I love this tag because it was embossed with a stamp that reads “My heart is at home by the Sea” which really resonates with me.

I made the little turtles using the same stamp as in the tag, colored them, cut them out and glued them into the journal. I wanted a little texture for the turtle shells so I used Inkssentials Glossy Accents.

I had a lot of fun creating this journal layout and hope you will too!

Supplies

  • 9″ x 12″ Journal
  • Torn pieces of tissue paper or pages from a book
  • Gesso
  • Mod Podge or Gel Matte Medium
  • Acrylic Paint: Aqua and Royal Blue
  • Fiber Paste
  • Wave Stencil
  • Palette Knife
  • Assorted ocean themed stamps
  • Staz On Black Ink
  • Inkssentials Glossy Accents
  • Assorted ephemera and embellishments
  • Ranger Distress Ink – Black Soot
  • Glue
  • Scissors

Instructions

  1. Paint your pages with gesso. Let dry.
  2. Tear small pieces of paper and glue them to the journal pages with Mod Podge or Gel Matte Medium. Let dry.
  3. Paint your background in your favorite acrylic paint. Allow the torn pieces of paper to show through the paint a little. Let dry.
  4. Mix fiber paste with a darker contrasting acrylic paint and apply using a palette knife and wave stencil. Let dry.
  5. Stamp sea life images to the pages with the Staz On Ink and add ephemera you have that will go with the ocean theme. You can also stamp or draw images, color them with paint, cut them out and glue them to the pages like I did with the little turtles. I also added a little Glossy Accents for more texture.
  6. Distress the edges with Ranger Black Soot.
  7. Add your quote.
  8. Add any shading and highlights where needed. Add a little sparkly glitter and that’s it!

Thanks for stopping by!

Share the Happy!!

Watercolor Sailboat – Tutorial

I enjoy sailing, but never seem to do it enough. It is so very peaceful to sail in the open waters. I love listening to the waves splash against the boat as it zips through the water at the mercy of the wind.

I created this painting last month from an online tutorial. My art for this week is a bit behind schedule with the Thanksgiving holiday but I’m working to catch up. It was my first try at painting waves with watercolor and it was harder than I originally thought. I used a pen for a little outlining and that was it.

This is probably the only painting I’ve ever done without adding bling with Stickles. It was hard to do, but thank goodness I survived, lol.

I hope it inspires you to create!

Thanks for stopping by.

Share the happy!