Thoughtful Thursday Yellow Crested Night Heron

Yellow Crested Night Heron Fledging

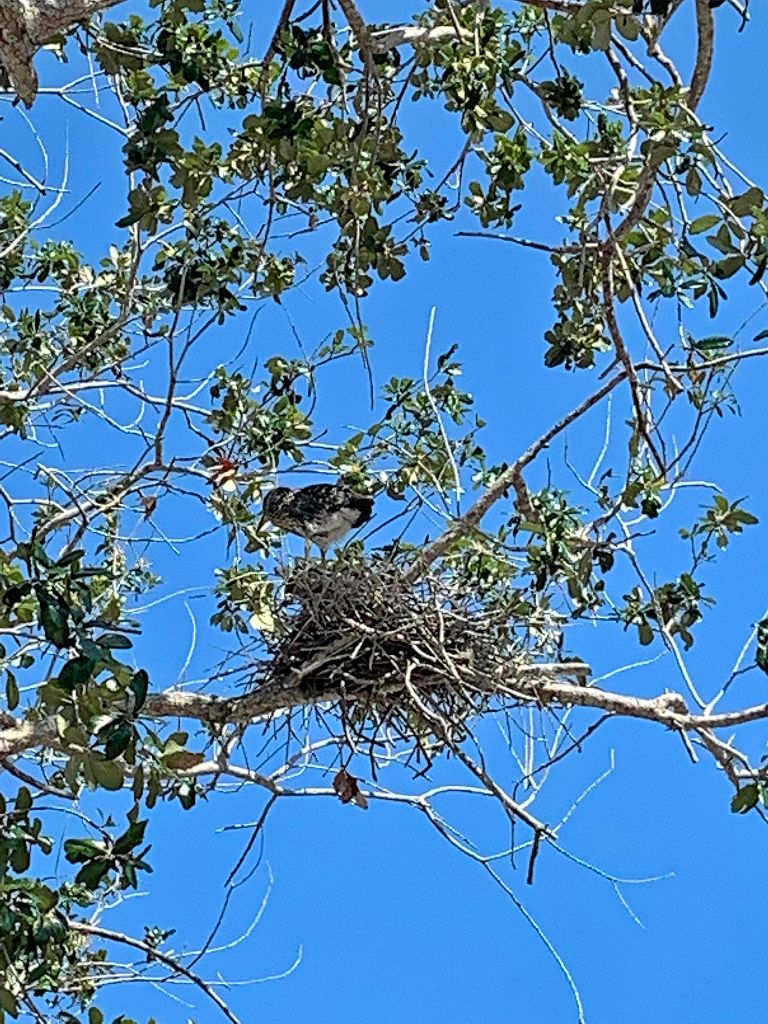
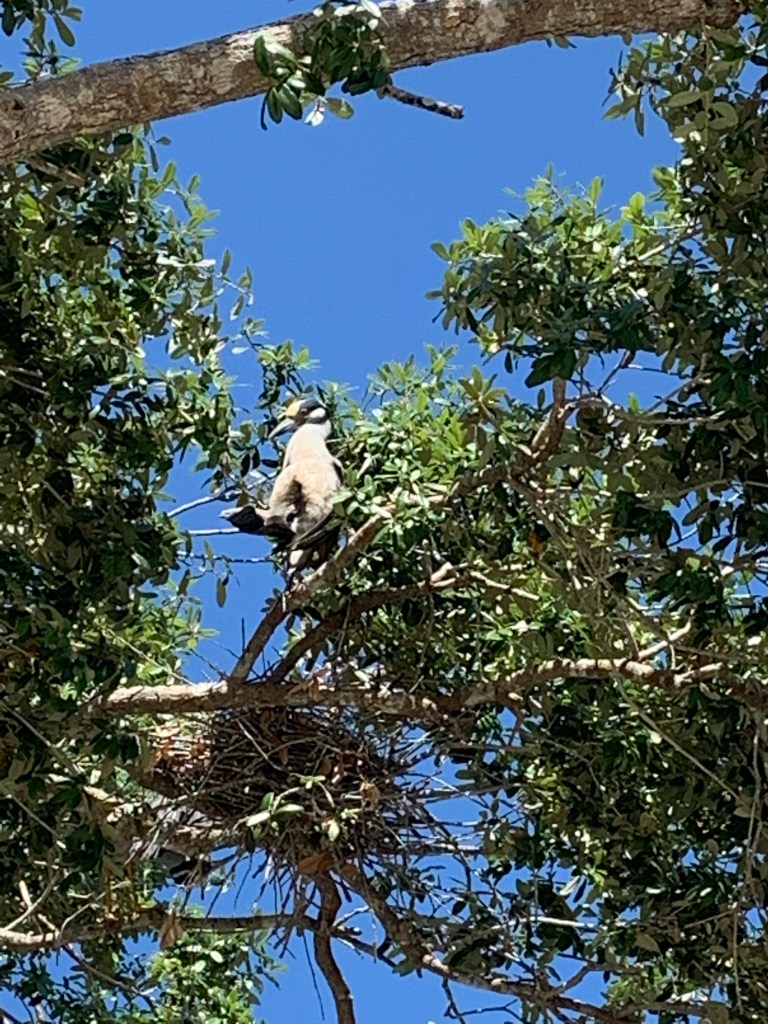
I was very blessed this spring to watch these beautiful birds make their nests high up in the oak trees that line our streets. A few years ago we started with only 1 nest and now we’re up to 5 nests in all. As I went on my daily walks, I was eagerly watching each nest as babies began showing their heads one by one. These new birds have now taken up residence in our neighborhood and I see them often by the lakes.

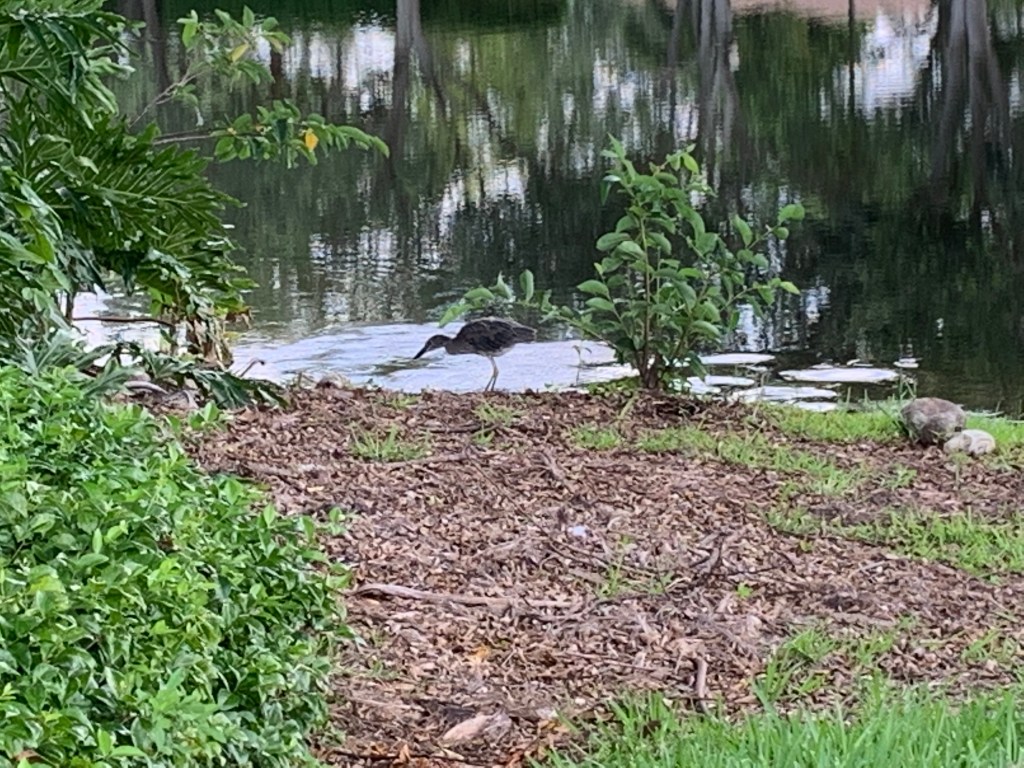
When they were very young we would come home at night to see them walking in the middle of the street. I guess they were still trying to figure it all out. They would even visit me in our backyard every now and then.

These herons forage for food at dusk and into the night. However, you may also see them foraging during the day. They tend to walk slowly on land or in shallow water and will sometimes stand completely still waiting for dinner to come to them.

Yellow Crested Night Herons are primarily found in the Southeastern parts of the United States. Adult herons will lay anywhere from 2-8 blue-green eggs in a nest. Both parents will incubate the eggs for 21-25 days. Once the eggs hatch it’s up to both parents to feed the babies. They haven’t been studied enough so there is no data as to when they take flight and leave the nest. Fully grown they measure 1 ft 10 in to 2 ft 4 in. They are simply beautiful and amazing to watch.

I hope your enjoyed this little snippet about the Yellow Crested Night Herons and are able to see some. These are some of the photos I was lucky to get on my walks.

Thanks for stopping by!!

Share the Happy 💖

“Beyond even the darkest clouds the wide, open blue sky goes on forever. Trust, let go, and allow yourself to take flight. So fly! Only then can you soar.” ~Martta Karol

John Adams Words of Wisdom Abstract Art

Today I thought I’d share a motivational quote with you today by John Adams on one of my abstract paintings:

“Courage and perseverance have a magic talisman before which difficulties and obstacles vanish into thin air.”

These are encouraging and uplifting words of wisdom to live by. Hope this inspires you in some way today!

Thanks for stopping by!!!

Share the Happy 💖

I am what I am Mini Art Journal

I hope your weekend is off to a good start! I’ve been working in my mini 3″ x 4.5″ journal. I have 2 more pages to go and then it will be finished. I found this inspiring quote by Eleanor Roosevelt and thought it was a good fit for this journal:

“I am what I am today because of the choices I made yesterday.”

Have a wonderful weekend and thanks for stopping by!!!

Share the Happy 💖

Thoughtful Thursday Vegan Pumpkin Smoothie Recipe

Photo by Kindel Media on Pexels.com

Pumpkin pie is one of my favorite treats for Thanksgiving but that only comes once a year. So to get into the spirit of Autumn sooner I love making pumpkin smoothies.

When you slowly sip this savory drink bursting with flavors of cinnamon, ginger and nutmeg you can’t help but to sit back and take a moment to truly enjoy the season. This recipe is very easy to make and is super delicious! I always try to use organic ingredients when they’re available.

Pumpkin Smoothie

  • 1 C Unsweetened Almond Milk
  • 1/2 Can Organic Pumpkin Puree
  • 1 Small Ripe Banana
  • 3 Tbsp Organic Rolled Oats
  • 2 Organic Pitted Dates
  • 1.25 tsp Cinnamon
  • 1/4 heaping tsp Ginger
  • 1/8 heaping tsp Nutmeg
  • 1/2 Tbsp Maple Syrup
  • 1 C Ice
  • 1/2 Hass Avocado (optional) *

Place all ingredients in the blender and blend until smooth. Top with sprinkled cinnamon and enjoy! (Makes about 2 glasses)

* Note: If you prefer a thicker, creamier smoothie the avocados do the trick. They have a mild flavor and give you more of a milkshake consistency. But I would try it first without the avocado because you can always add it later, it should be thick enough without it 🎃 Another trick is to use 2 Tbsp Organic Chia seeds. Soak them overnight in water and add them to your smoothie mix and blend.

Thanks for stopping by!!

Share the Happy 💖

Candy Corn Witch Hat

When I was a kid, candy corns were one of my favorite Halloween treats. They made awesome vampire fangs 😂 So it’s no wonder I used them to make a witch’s hat.

For this project I recommend getting clay candy corns. You can use real ones and coat them in Mod Podge, but they won’t last whereas the clay ones will. If you want to get even more creative you could make them yourself 😊

This is a fun and easy Halloween Decoration to make for your home and is great for kids too.

For this Project you will need:

  • Large Paper Mache Witch Hat (about 12 inches tall)
  • Acrylic Paints: Folk Art School Bus Yellow and Black
  • Clay Candy Corns
  • 18″ white netting
  • Black Pom-poms: 1 large and 1 small
  • 2 small wiggle eyes
  • 2 Yellow/Orange Chenille Stems Pipe Cleaners 
  • Letter Rubber Stamps
  • Staz On Stone Gray Ink
  • Small Orange Boa, 18-24 inches long depending on your hat
  • Sponge brushes (makes painting big sections faster)
  • Aleene’s Tacky Glue
  • Glue Gun
  • Scissors
  • Wire cutters
  • 1/2″ flat brush
  • Clean water, paper towels, wax-coated paper plates for paint palette
  • Mod Podge: Matte for sealing (optional)

Instructions

  1. Basecoat the top of your witch hat in black paint using the 1/2″ brush. Apply 2-3 coats and let dry in between coats.
  2. Basecoat the bottom and inside of the hat with 1 coat of the black paint using the 1/2″ brush. Let dry.
  3. Basecoat the rim of the hat, on top in yellow paint using the 1/2″ brush. Apply 2-3 coats and let dry in between coats.
  4. Using the glue gun, randomly glue candy corns around the top of the hat.
  5. Stamp you letters around onto the rim of the hat. If you’re not going to seal your hat with Mod Podge go to Step 8.
  6. (Optional) Using your sponge brush apply a coat of Matte Mod Podge to the entire hat to seal it. Let dry. Once dry you can apply a second coat of Mod Podge if you so desire.
  7. (Optional) Apply 1 coat of Mod Podge to the bottom and inside of the hat. Let dry      
  8. For the spider, glue the small pom-pom to the large pom-pom using tacky glue.
  9. Using wire cutters, cut five 2″ pieces of the yellow/orange pipe stem. Bundle 4 of the pieces and twist the 5th piece around the center of the bundle to hold in place. Spread out the pieces and shape your spider legs. Cut off any excess.
  10. Glue your spider body to the legs with tacky glue. Next glue the wiggle eyes to the front of the small pom-pom. Let dry.
  11. Apply a generous amount of tacky glue to the inner seam of the hat where it meets the rim. Wrap your boa around the hat and cut off any excess. Let dry.
  12. Cut a 12″ piece of netting and tie the center into a knot. Apply tacky glue to the tip of the hat and place the center of the knot over the hat. Let dry.
  13. Gently insert the spider fee into the netting holes and you’re done!

Hope you enjoy making this fun Candy Corn Witch Hat🎃 Thanks for stopping by!!

Share the Happy 💖

Candy Corn Witch Hat

Pure Joy Mixed Media

Happy October!! I hope you’re doing well. The temps have finally cooled down here a bit and it’s really nice being outside without roasting 😊🍂

I thought I’d share with you a fun and whimsical mixed media canvas I made a while ago. I painted it with bright fun colors and used lots of different techniques and mediums including pages from a book, buttons, ephemera and stamped images.

What do you think?

Have a fabulous weekend and thanks for stopping by!!!

Share the Happy 💖⠀

Inchie Challenge Journal

I had lots of fun creating the inchies for Amy Maricle’s 2022 Inchie Challenge and now they needed a home. I came across this 2.25″ x 3″ mini journal I started a while ago. I had set it aside because I wasn’t sure what I wanted to fill it with but the inchies seemed to be the perfect fit. So I assembled the journal, painted it and added my inchies.

Thought the video turned out kinda cute. What do you think?

Thanks for stopping by!!

Share the Happy 💖

“Art is not what you see, but what you make others see.” ~Edgar Degas

Starry Night Journal

I hope your weekend is off to a great start! This was a painting I started before my studio reno got underway and now I was able to finish it. I was experimenting with different types of paint and shades of blue and purple. Originally this painting didn’t have any clouds but it looked like it was missing something so I added them in. What do you think?

Thanks for stopping by!!

Share the Happy 💖

“I know nothing with any certainty, but the sight of stars makes me dream.” ~Vincent Van Gogh

Slow Pace of Autumn

Photo by Pixabay on Pexels.com

Hard to believe that autumn is officially here today. It’s the time of year to slow down and really take in the beauty of the season. Before long, Mother Nature will repaint her canvas from beautiful greens to stunning hues of yellow, red, orange and brown. Gentle breezes begin to roll in and rustle the fallen leaves bringing much needed cooler temps.

We bid farewell to summer as we watch the days become shorter and nights become longer. We get our warm comfy sweaters out, light a few candles and settle in for the season. It’s a time to rest, reflect and finish what’s needed.

Although here in the South we don’t really see a change in this breathtaking season, I bring warmth into our home by decorating for fall. Being an avid baker the sweet scents of pumpkin, apple and cinnamon fill our home making it even more cozy. How do you spend your autumn months?

Wishing you a peaceful autumn season filled with joy, love and good health!

Thanks for stopping by!!

Share the Happy 💖

Poppies Mixed Media Art

I thought I’d share with you today one of my older pieces of art I created a while ago from a tutorial in Zendoodle Magazine which sadly isn’t published anymore. It was a beautiful publication with eye catching designs and tutorials I really enjoyed.

This mixed media art was made using collaged tissue paper which is a medium that’s such fun to use. To this day this is still one of my favorite pieces of art for many reasons. I love the bright colors, texture, doodles and overall design. What do you think?

Thanks for stopping by!!

Share the Happy 💖

“Flowers are like friends, they bring color to your world.” ~Gerard De Nerval